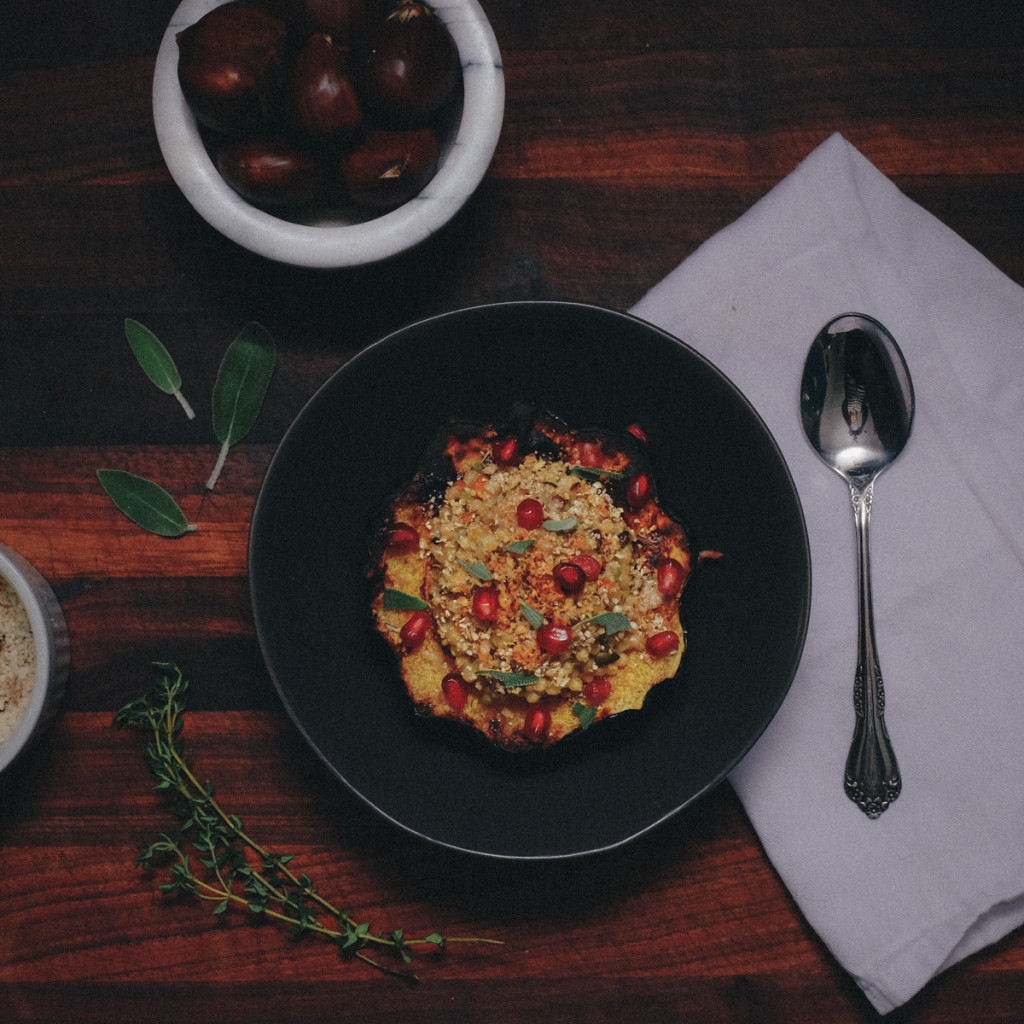
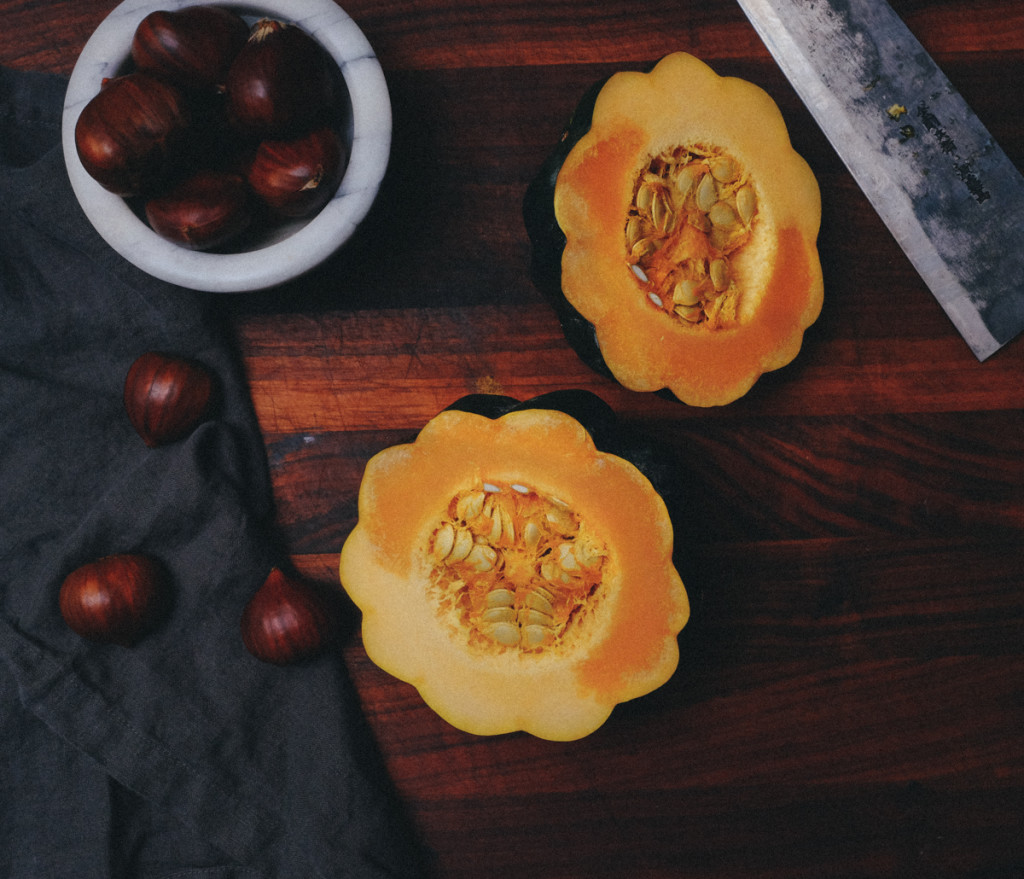
I’ve been willfully ignoring the alarmingly warm November and going all in on squash season. Ed’s been working some late nights, and while my inclination is to crack open a box of mac n cheese and binge watch Netflix with cats, I’m hanging onto some of my pride with squashes full of grains. Nearly as easy, just as satisfying, and with a bright orange that wasn’t sprinkled out of a packet of powdered cheese.
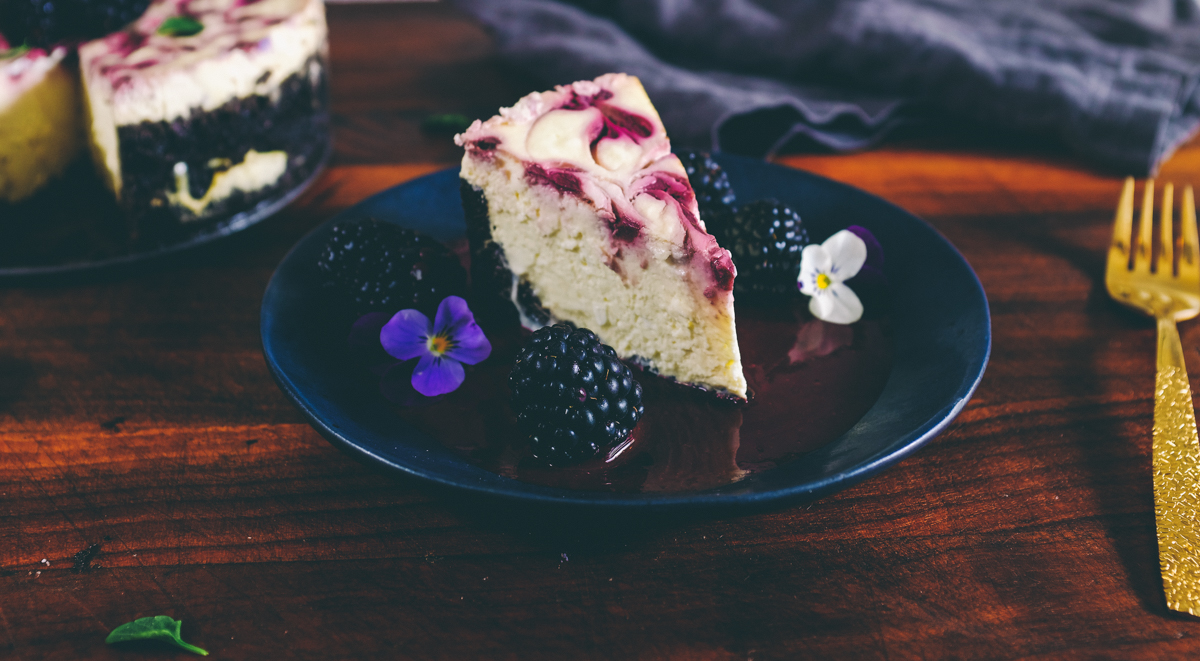
Last week, we did a major kitchen reorganize and finally re-opened a pantry cabinet that we had painted shut a few months ago (oops!). Rediscovering a slew of baking pans, and not to be outdone by Ed’s tiny cinnamon loaves, I decided to welcome the springform pan back into the family with cheesecake.
I’ve never actually made cheesecake before. Edit: I have only actually made cheesecake once before, a lemon ricotta recipe years ago that was alarming terrible. I scanned a few recipes with good reviews, but they all seemed to make strange substitutions like “challenge butter” (what is this???) or questionable no-bake options (why?). Eventually, I landed on a Serious Eats recipe that I used with a few quick alterations.
The night before our baking marathon, we celebrated four years of hanging together and went a little too hard. Waking up to discarded champagne bottles and a half eaten box of Birthday Cake Oreos, I figured I’d salvage some of the destruction an replace the graham cracker crust with chocolate. A lot of the recipes are all for using the entire cookie, but not wanting to mar the beauty of fresh berries with Birthday Cake frosting, I scooped it out before pulsing the chocolate wafers in the blender. We only ate a few scoops of Oreo centers before burying them in the garbage with the rest of our self respect.
My springform pan is a little guy, so I halved the Serious Eats recipe from the get go. I replaced half of the cream cheese with neufchatel, which I want to say was for health reasons, but if we’re being honest we had already planned on baking enough sweets to feed 12 with only two of us around. Really, it just seems more exotic and is half the price of cream cheese at our grocery store. I ditched the cream for buttermilk, which we picked up for the swirly bread.
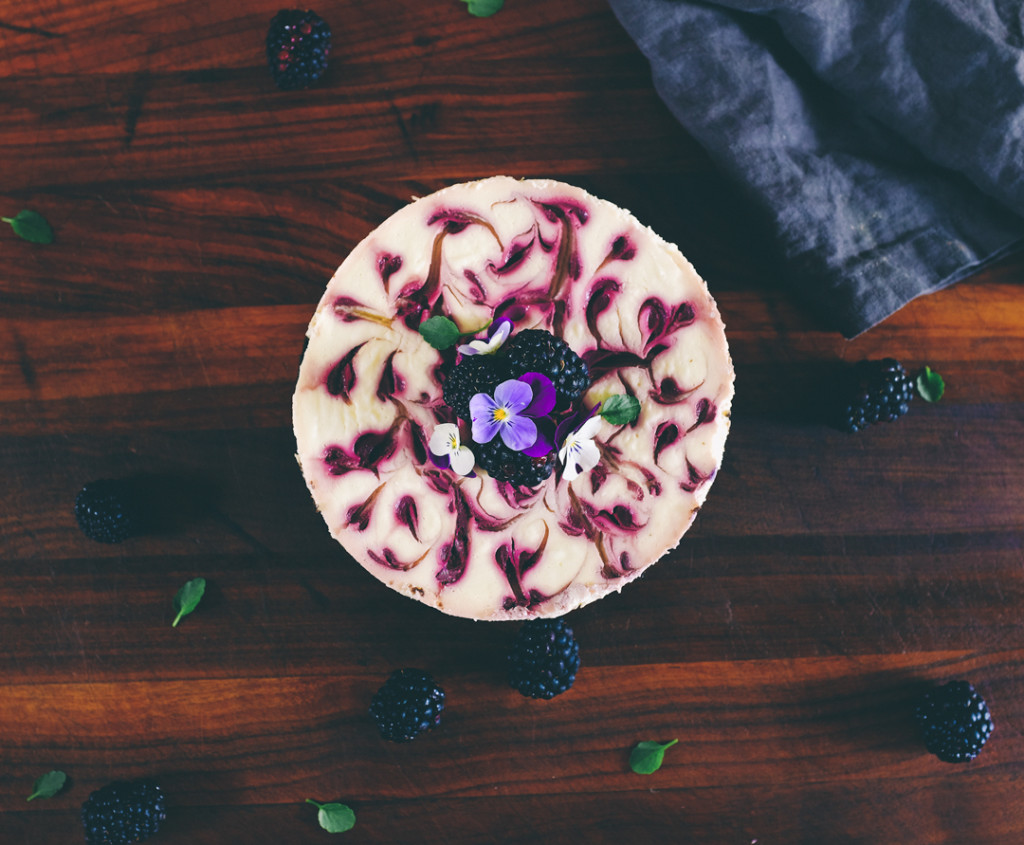
The preparation takes a little more massaging than “toss in all ingredients and mix on high” but is fairly straightforward. I was a little hesitant to try my hand at the marbled top, but after scrolling through a few youtube videos I mustered up the courage to go for it. I dosed dots along the top of the poured cheesecake mixture from a plastic squeeze bottle, and swirled through the center of each dot with a skewer, moving from the center toward the outer edge in a semi random pattern.
For my (almost) first stab at cheesecake, it went pretty smoothly aside from some cracking along the swirl pattern. The texture was dense and creamy and melded well with a dollop of berry puree and chocolate crust.
Blackberry Neufchatel Cheesecake with Chocolate Crust
A dense cheesecake with a summer berry swirl and a dark chocolate crust. This recipe uses a 7" springform pan
Recipe type: Dessert
Ingredients
For the crust:
The shells of 25 Oreo cookies
Pinch of salt
5 tablespoons unsalted butter, melted
For the cheescake:
1 8 oz. box of cream cheese
1 8 oz. box of neufchatel
½ cup sugar
½ teaspoon salt
2 teaspoons pure vanilla extract
2 large eggs, at room temperature
¾ cups buttermilk
For the blackberry swirl:
Blackberries
Granulated sugar
Instructions
To make the crust:
Pulse the chocolate wafers of roughly 25 Oreos in a food processor until you reach your desired texture. I chose to pulse until the Oreos resembled a heavy sand.
Melt 5 tablespoons of butter and pour over cookie mixture. Pulse until well blended.
Add salt and pulse until combined.
Center a rack in the oven, preheat the oven to 350°F and place the springform on a baking sheet. Bake for 10 minutes. Set the crust aside to cool on a rack while you make the cheesecake.
Reduce the oven temperature to 325°F.
To make the puree:
Blend blackberries and granulated sugar until smooth.
Pour mixture into a plastic squeeze bottle or pasty bag. Reserve the leftover to serve with finished cheesecake.
To make the cheesecake:
Put a kettle of water on to boil.
Using a stand mixer with a paddle attachment, beat the cream cheese at medium speed until soft. Leave your mixer running and add sugar and salt. Continue to beat another 4 minutes or so, until the cream cheese is light. Beat in the vanilla. Add the eggs one by one, beating for a full minute after each addition—you want a well-aerated batter. Reduce the mixer speed to low and stir in the buttermilk.
Put the foil-wrapped springform pan in the roaster pan.
Give the batter a few stirs with a rubber spatula, just to make sure that nothing has been left unmixed at the bottom of the bowl, and scrape the batter into the springform pan. The batter will reach the brim of the pan. (If you have a pan with lower sides and have leftover batter, you can bake the batter in a buttered ramekin or small soufflé mold.) Put the roasting pan in the oven and pour enough boiling water into the roaster to come halfway up the sides of the springform pan.
Dot the top of the cheesecake surface with your berry puree. Using a skewer or toothpick, trace lines through the center of each dot, connecting one dot to the next, to create your marbled surface.
Bake the cheesecake for 1 hour and 30 minutes. To prevent browning, rest a sheet of foil over the surface of the cheesecake. Some cracking may occur during baking. Turn off the oven's heat and leave cheesecake to slightly cool with the oven door propped open for one hour.
Carefully pull the setup out of the oven, lift the springform pan out of the roaster. Remove the foil, taking care not to burn yourself with any water that may have seeped into the foil. Let the cheesecake cool to room temperature on a cooling rack.
Once the cake is cool, cover the top and chill the cake overnight.
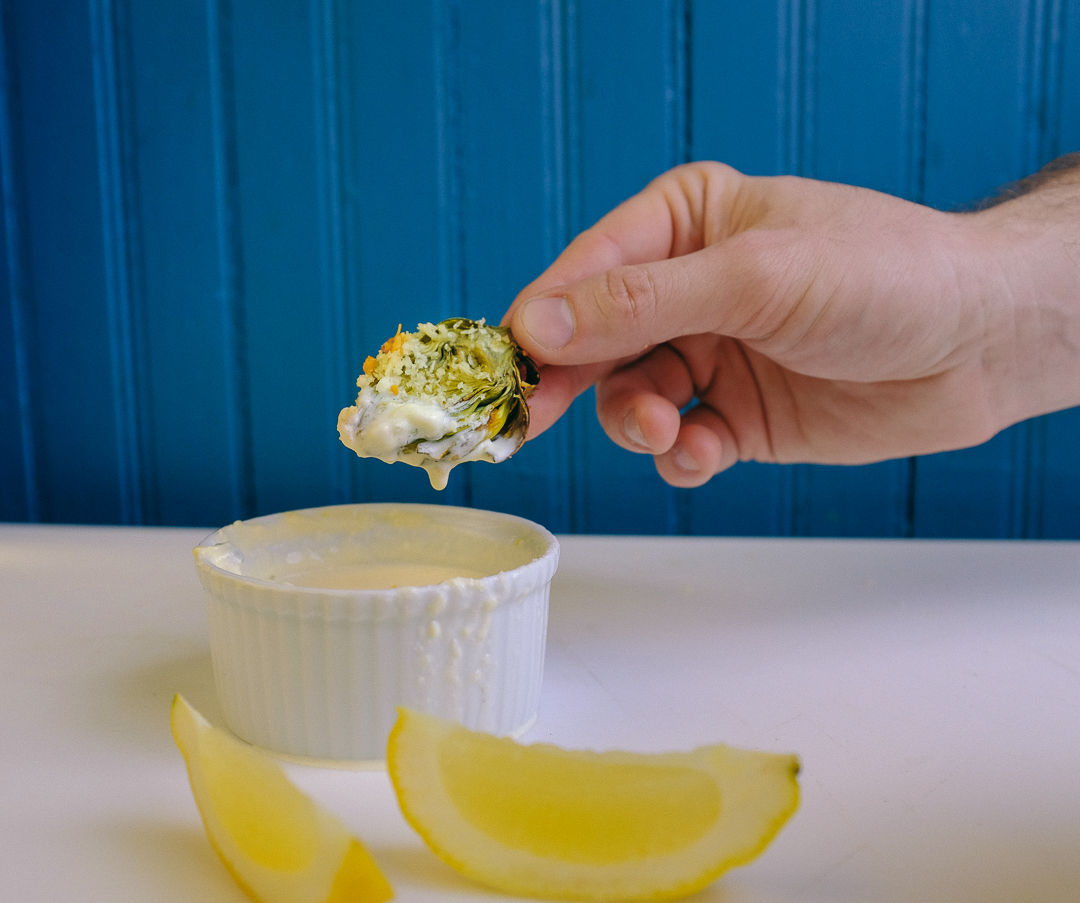
We grew up in a weird time for food. I, personally, come of age eating a hell of a lot of canned vegetables. Questionable textures, often drowned in butter and saccharine sweet. One thing my mother really did right, though, was artichokes. I have nothing but fond memories for spaghetti dinners that began with artichokes and lemon butter, and equally as many (potentially false) myths about the edible thistle. Did you know the Greeks ate artichokes before every meal as a palette cleanser?
My go-to preparation is normally steamed until tender and served with caper butter, but we’ve also taken to serving them alongside an herbed aioli [see: half mayo + half sage brown butter]. The dip is from one of our diehard favorite cookbooks, Maximum Flavor. They recommend roasting halved filled with garlic, but after a few attempts to change my ways I’m still a 100% advocate for steaming.
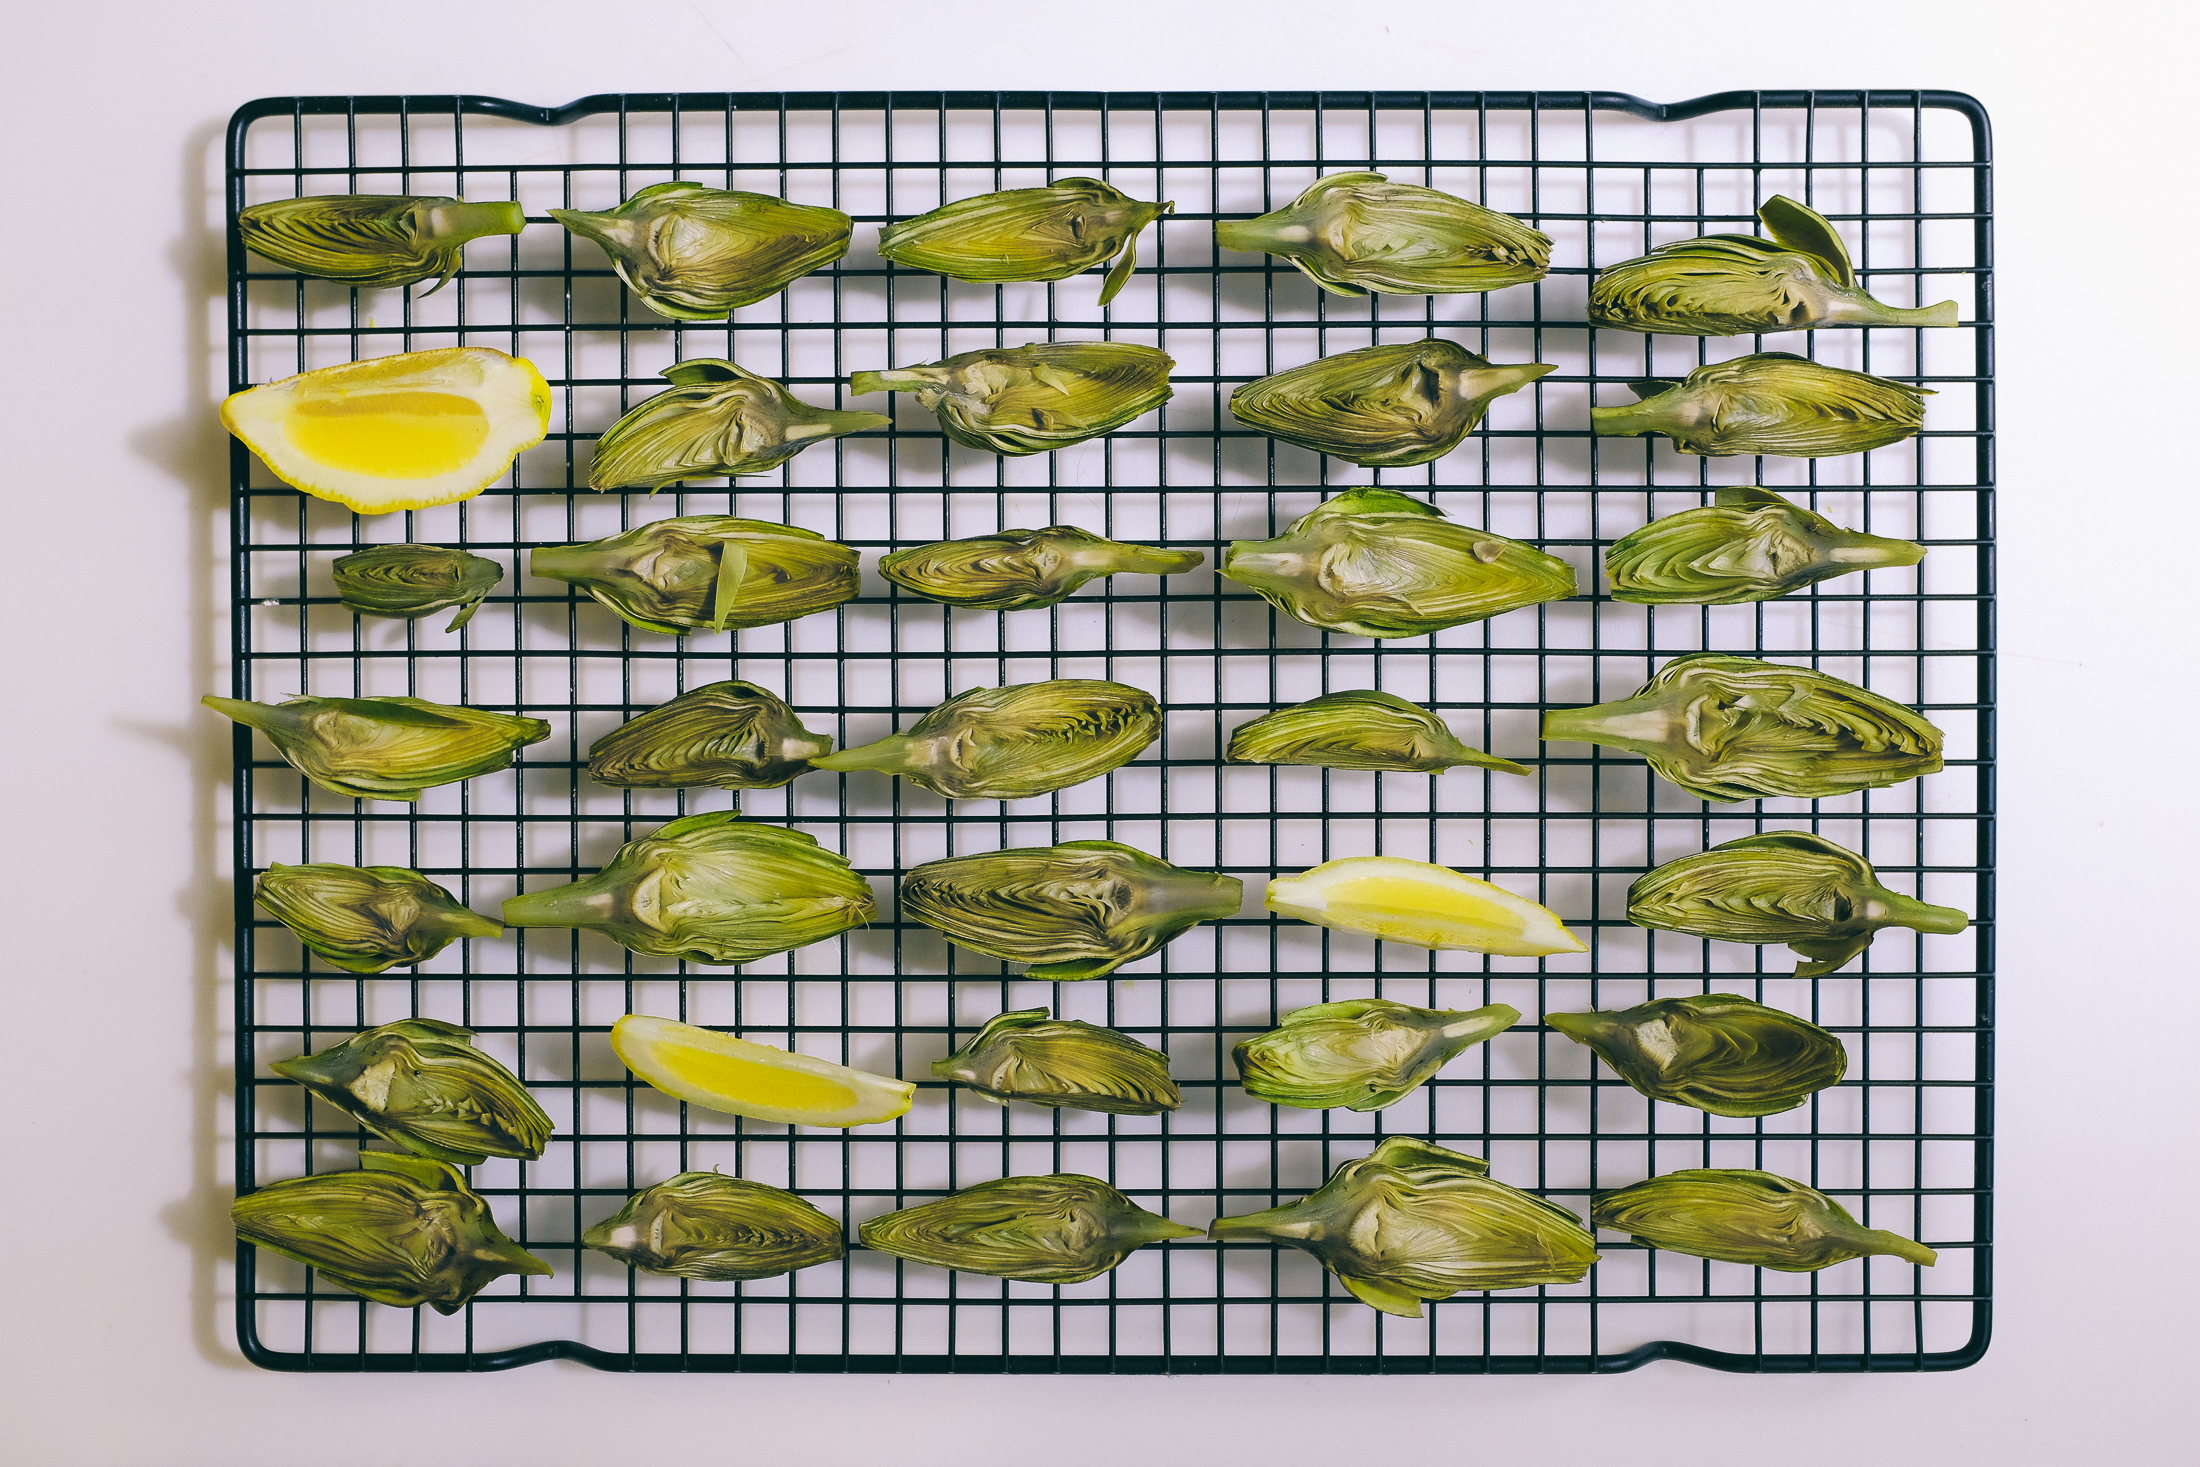
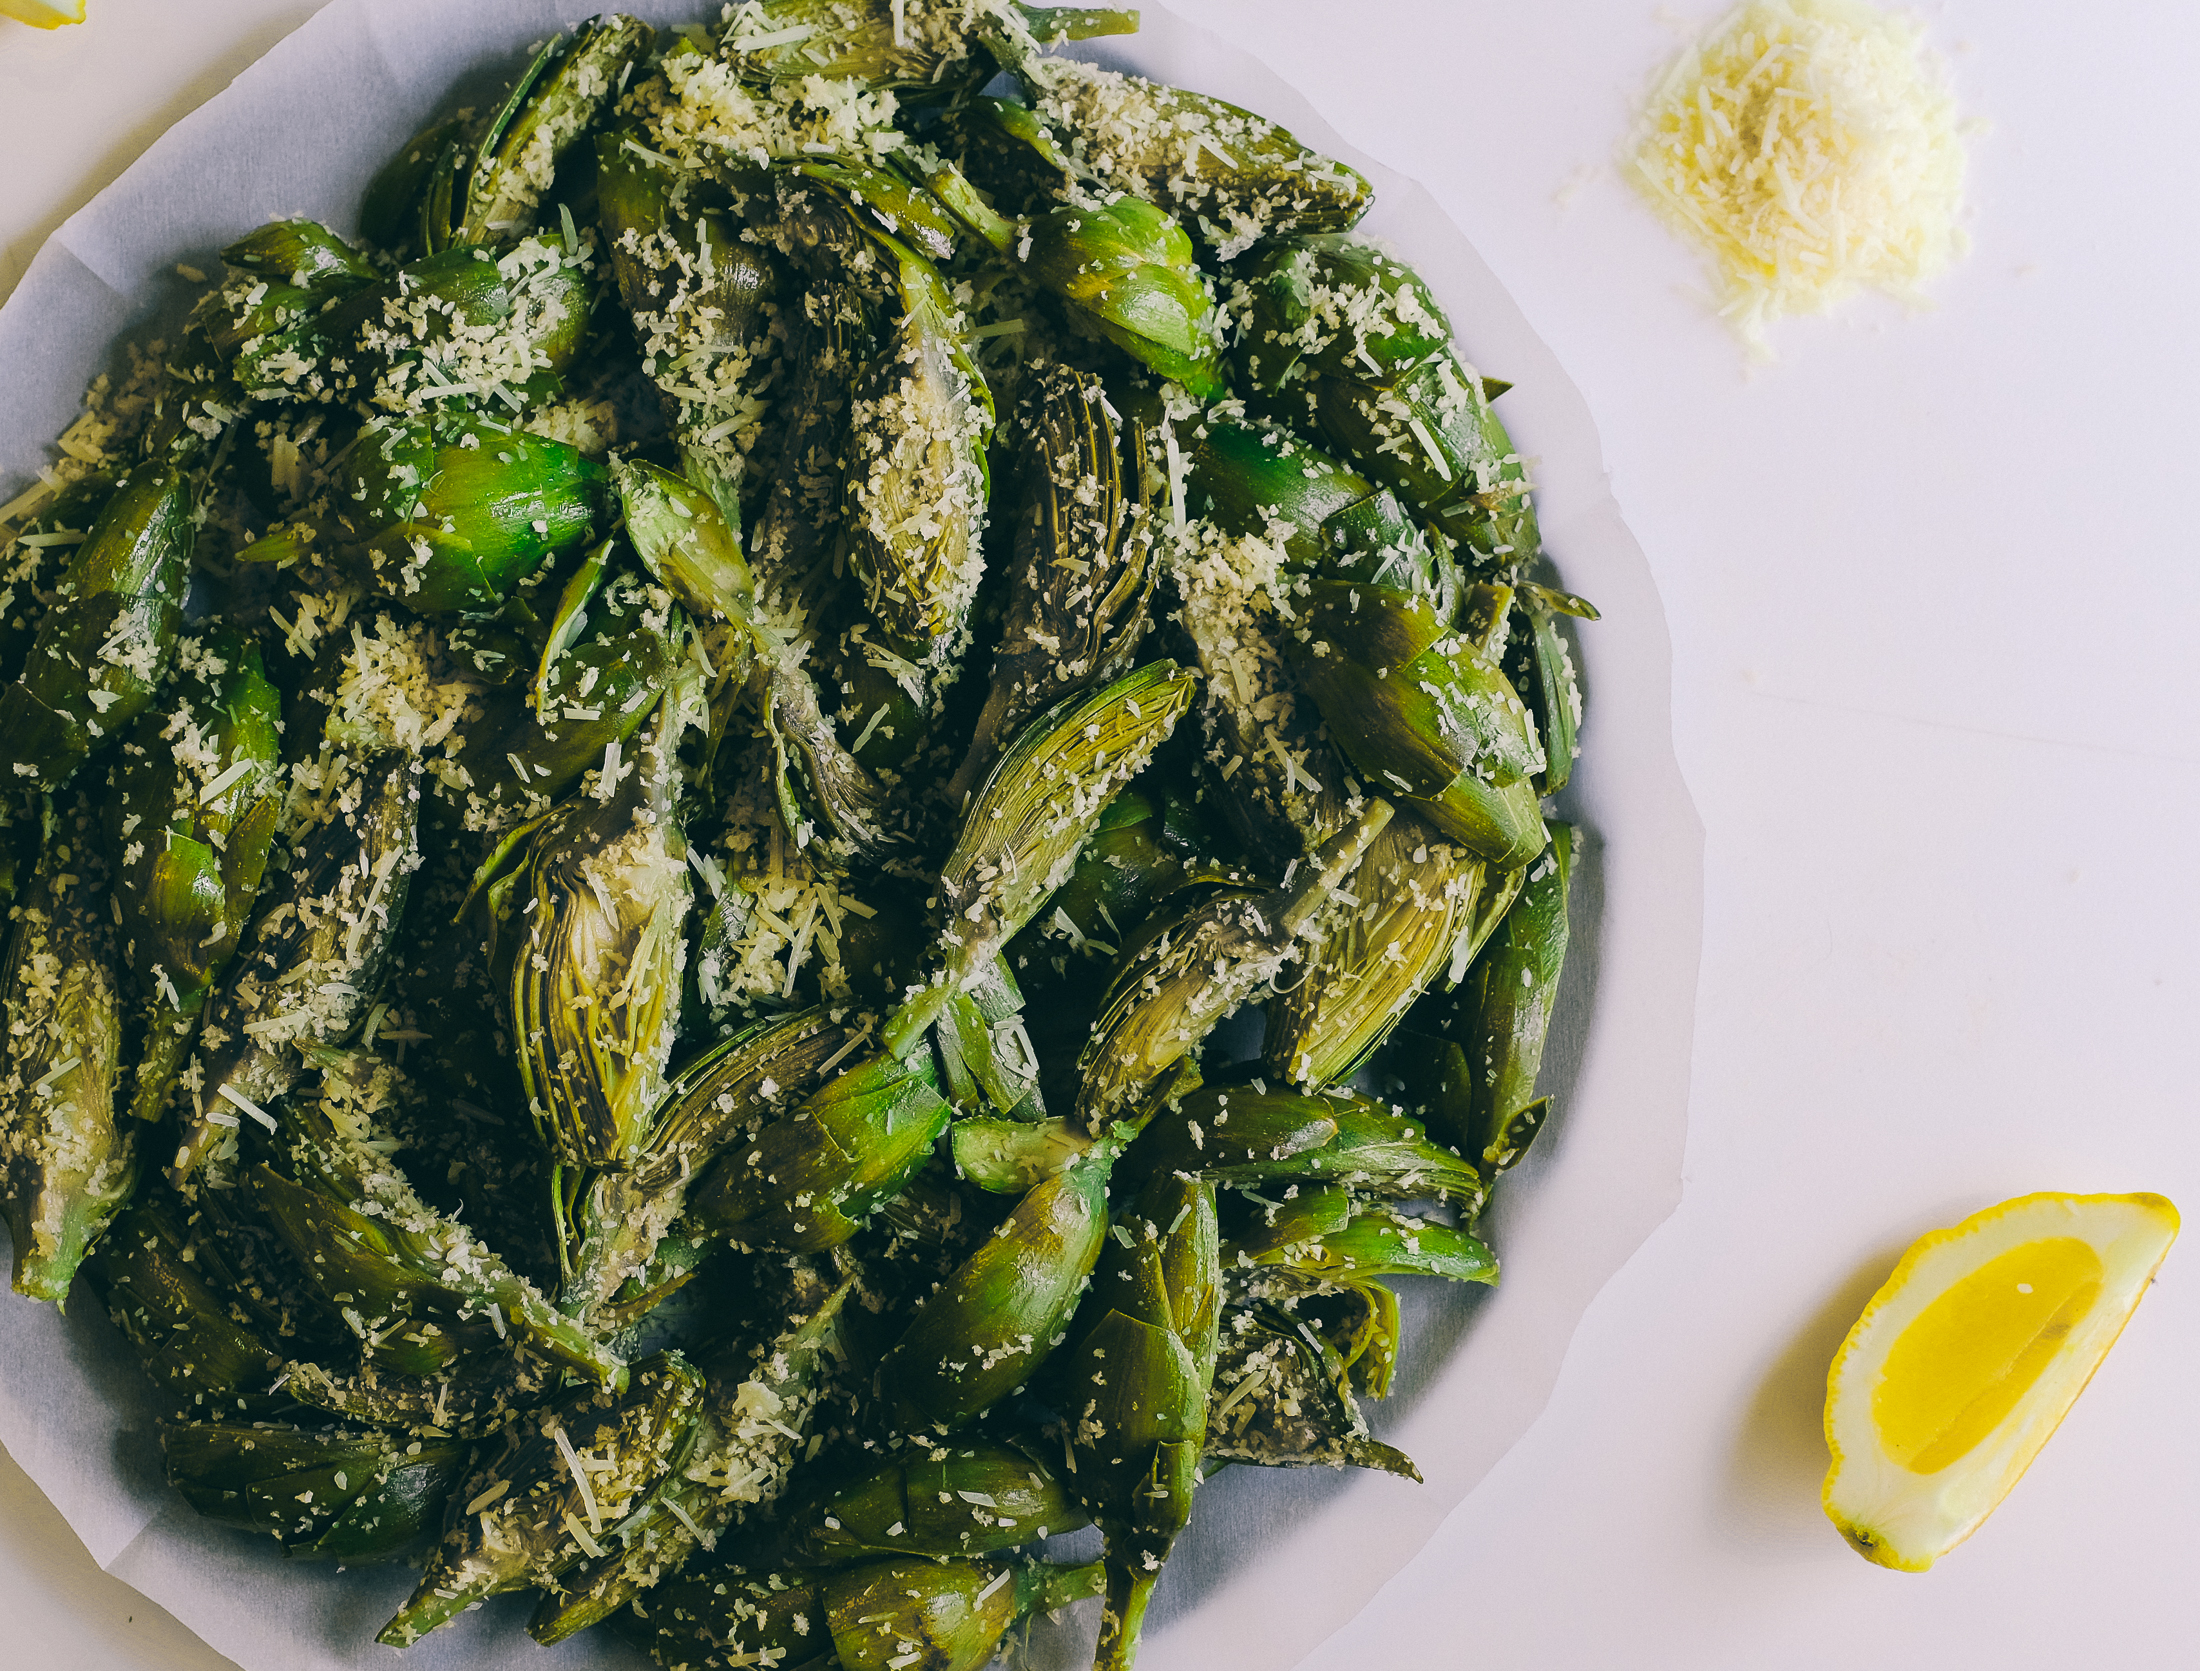
After a full out artichoke drought in the grocery store the last few months, we were pleasantly surprised to find a super affordable box of baby artichokes this week. Pinterest told us to bake them. Withsome hesitation from our previous disappointments, we opted to steam the quartered baby ‘chokes first and then toss in olive oil, panko, and parmesean and broil in the oven until crispy.
The final result was really satisfying, but definitely some room for improvements. The one thing I love about steaming is that it leaves the vegetable super tender and green. The added time for cooking in an oven tends to allow the artichoke to oxidize and dry out, and the outer leaves were a bit too tough to eat in their entirety. We had trouble deciding if it was the fault of drying out the leaves in broiling, or if the smaller of the bunch steamed more fully yielding a better texture.
Served with a bowl of lemon caper aioli, any minor setbacks in preparation are quickly eclipsed by the joy of eating a giant bowl of “vegetables” dipped in mayo while binge watching Seinfeld. 10/10
We spent the first day of the new year catching up on some much needed sleep, cracking open new notebooks, and gathering our thoughts so that could dive into 2016 with new energy. The last few months have been uncertain and tumultuous, so it’s always nice to take a step back and assess the goals that remain a constant and enjoy the progress we’ve made so far.
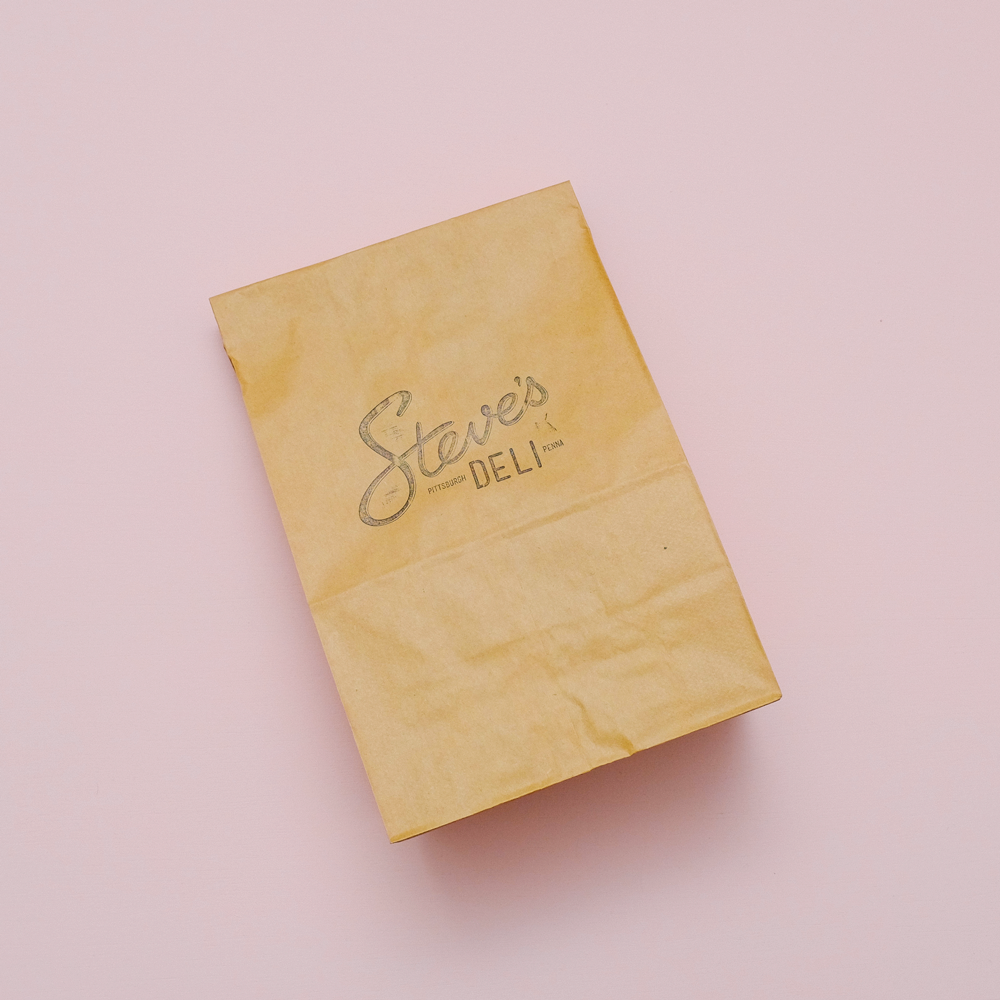
The Pittsburgh Public Market that Steve’s Deli occupies announced its search for a new home. While we’re excited to see what the move brings for our future as well as the PPM’s, it also brought on a wave of uncertainty that stifled a lot of our creative juices. Which brought us to resolution 1….
1. Focus on staying energized and pushing forward in areas we have complete control.
Sometimes it is hard to avoid feeling burnt out, especially with the prospect of finding a new home for the deli on the horizon.
Instead of focusing on questions we don’t have answers to, we’re resolving to focus on maintaining a schedule that helps us stay creative while building our brand and our skill set. Tweaking menu items, streamlining our business practices, and planning content in advance will help us map out our immediate goals. We plan to make an effort to post continually on our progress, helping us reflect on our achievements rather than our uncertainties.
2. Create better rituals.
We’re both diligent to leave the kitchen and the office outside of our home cleaned up and in perfect order before we leave work for the day. It is always nice to start the day off with a clean slate and we need to focus more on implementing those ideas at home. Putting away the last few dishes rather than sinking into a vegged out netflix-coma makes it easier to feel energized in the morning.
3. Waste less.
I try to keep this is as my constant resolution, but sometimes old habits die hard. Waste less time, waste less money, waste less materials. Waining produce from the deli isn’t always the easiest thing to see as showcase dinner staple, but we’ve been focusing on incorporating overstock items into our home cooking before they’re due to hit the compost bin. This has helped us scour our pantry and become more inventive while limiting trips to the store.
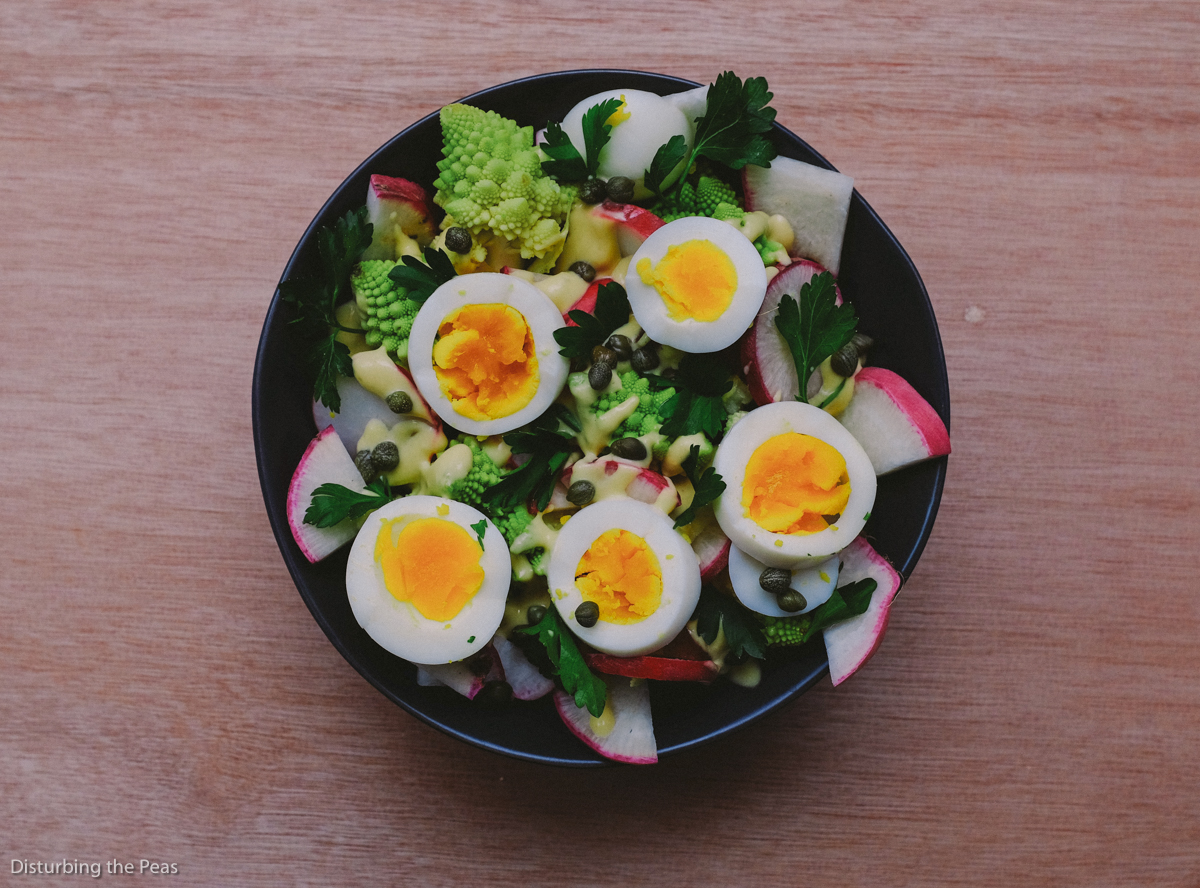
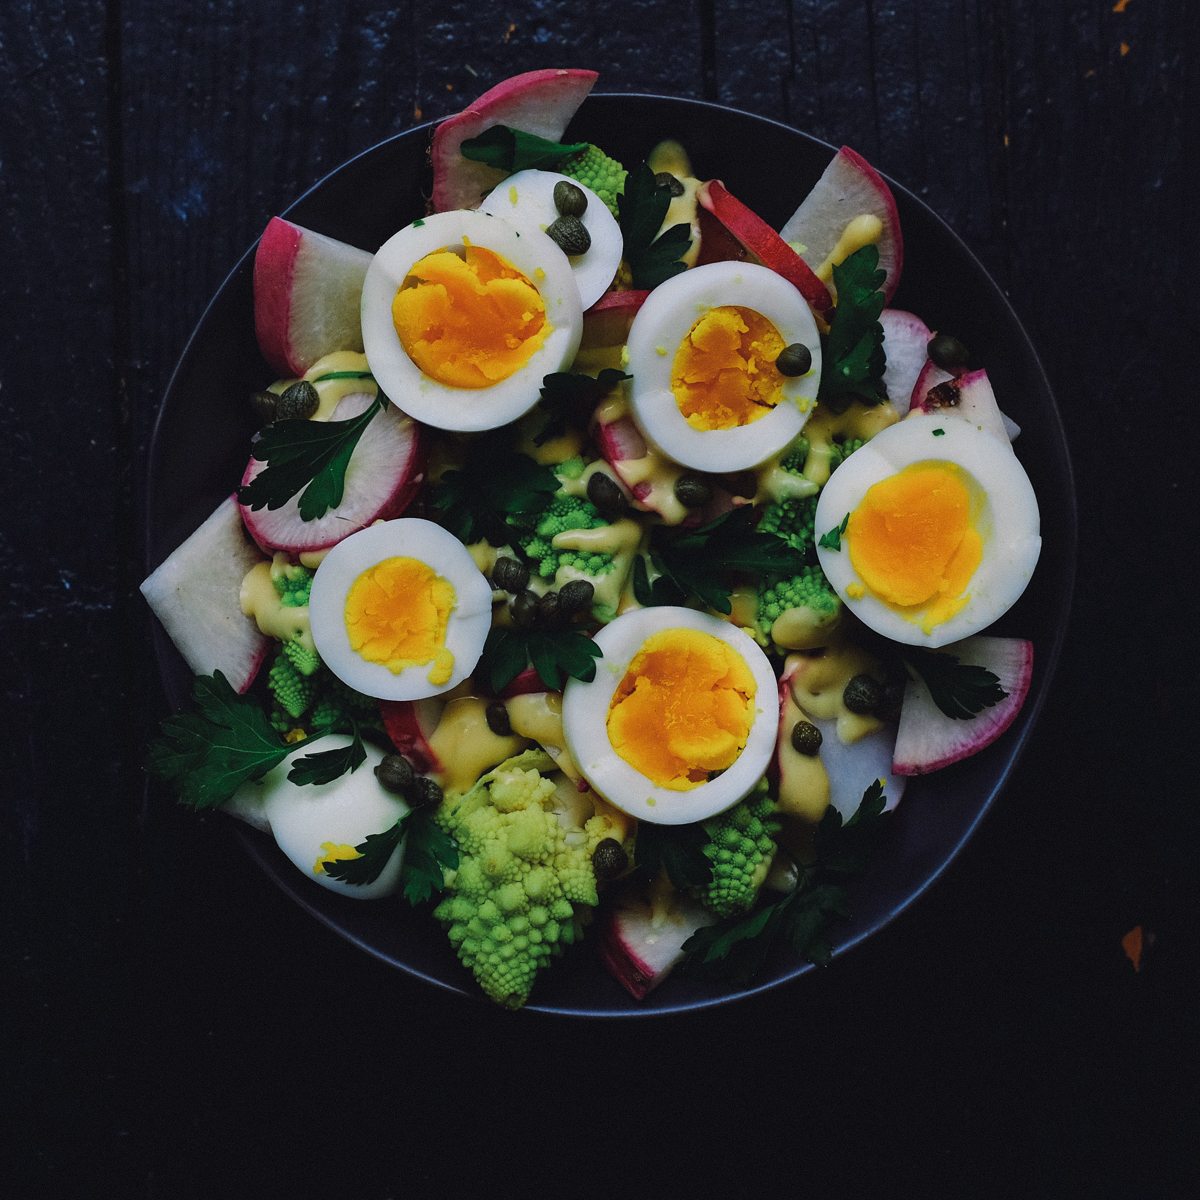
A hearty bowl with bold, bright flavors and an array of great textures.
Author: Disturbing the Peas
Recipe type: Veggie Bowl
Serves: 4
Ingredients
4 hard boiled eggs
1 head of romanesco broccoli
2 lbs medium red potatoes
1 large china rose radish
1 bunch parsley
3 garlic cloves, smashed to a paste with a little salt
1 tablespoon chopped anchovy
1 tablespoon chopped capers
2 teaspoons Dijon mustard
4 tablespoons white wine vinegar
⅓ cup extra virgin olive oil
Herbs to taste
Instructions
Preheat oven to 500 (broil)
Cube potatoes and boil for 12 minutes
Drain and place in oven for 10 minutes
Chop romanesco into chunks roughly 1" long and roughly the same size.
Place romanesco broccoli in microwave safe bowl with one tablespoon of water. Cover with saran wrap and microwave for 1 minute 40 seconds, or until tender. Watch the steam when you take it out.
Chop radishes
Combine garlic, anchovy, capers, dijon, vinegar, and olive oil and emulsify with immersion blender.
Place cooked potatoes, steamed broccoli, and radishes in a serving bowl. Drizzle with sauce, top with parsley, eggs, additional herbs, salt as desired.
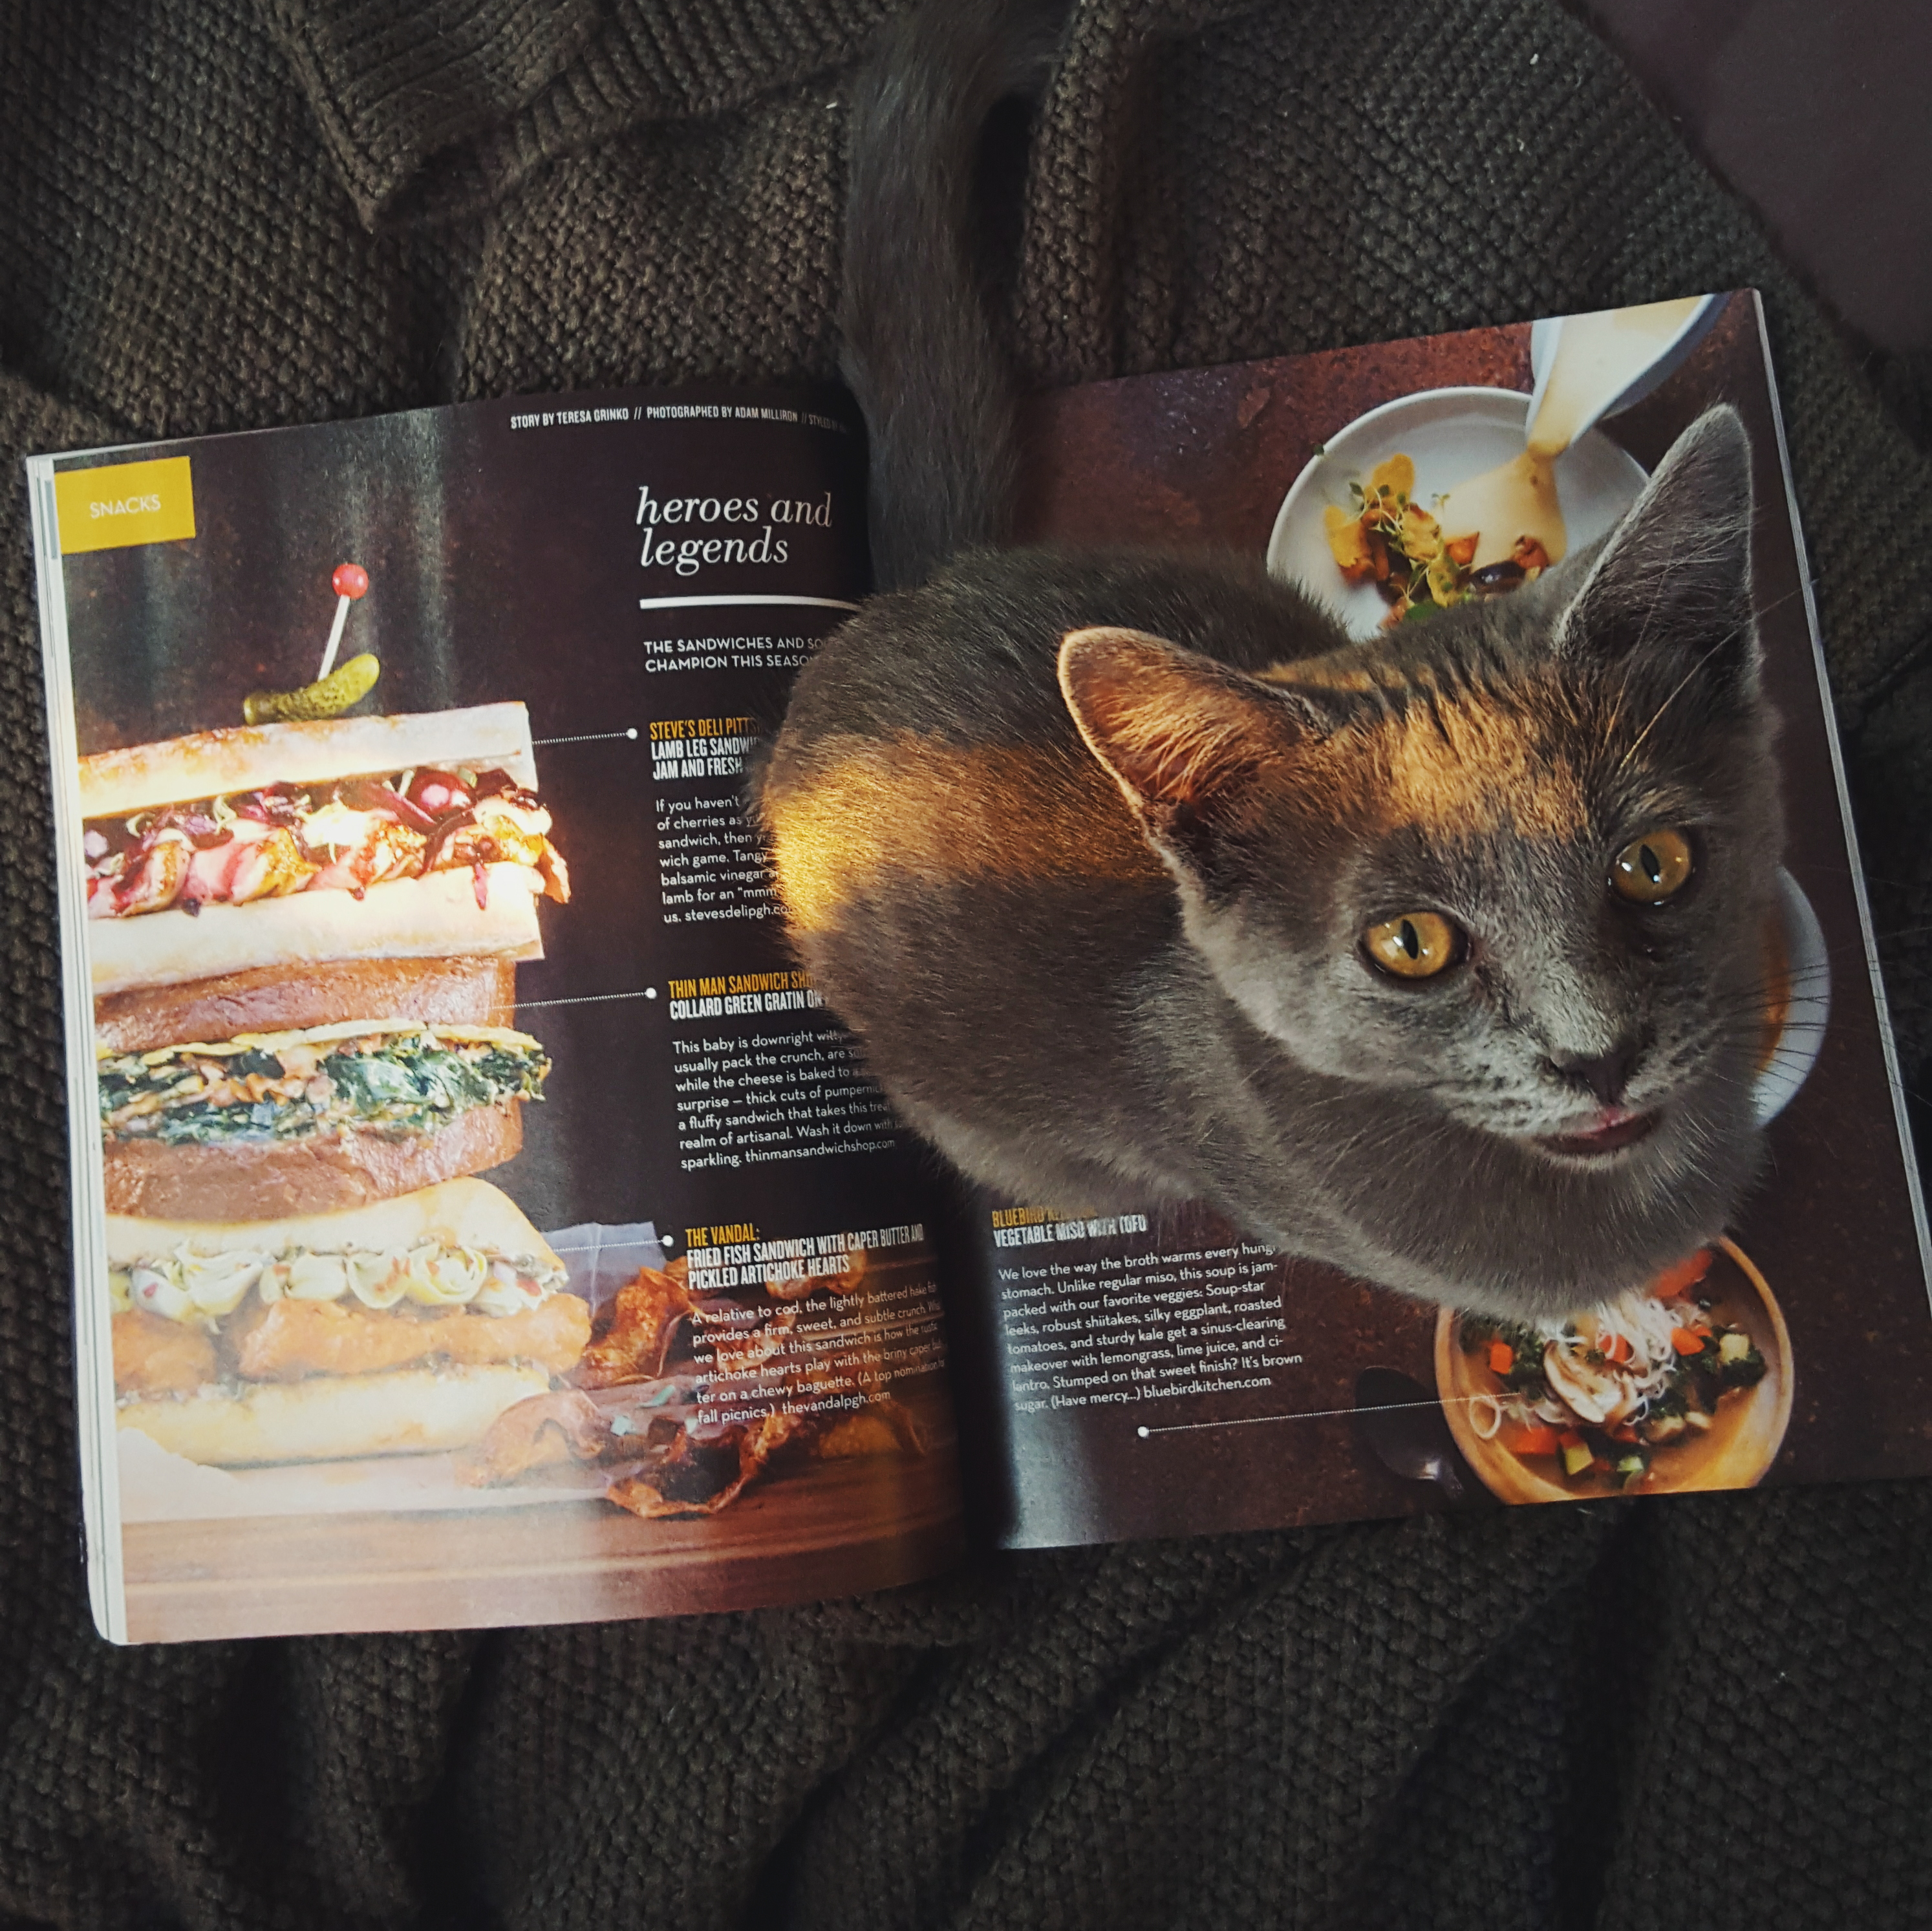
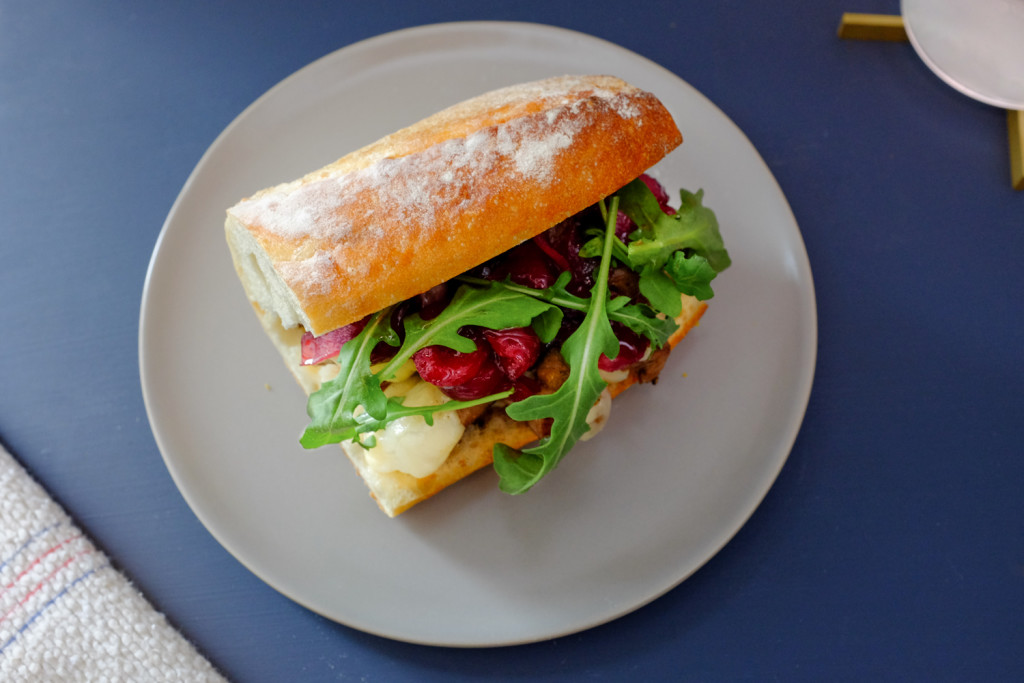
A few weeks before our official opening for Steve’s Deli, Table Magazine asked us about our favorite fall sandwich. The issue dropped last week and we’re really excited to be a part of it. See our full recipe below and make sure to grab a copy of the current issue with some killer additions from Thin Man Sandwich Shop and The Vandal.
Ingredients
1 baguette
1/2 cup pitted sour cherries
1/4 cup red onion chopped
2 sprigs thyme
1 tablespoon sugar
1 tablespoon balsamic vinegar
3 tablespoon butter
2 cloves garlic (minced)
1 lb boneless butterflied lamb leg
4oz creamy firm cheese (we used Cypress Grove’s Lamb Chopper)
1 bunch sage chopped into ribbons
salt and pepper
juice of 1/2 lemon
Preparation
For the jam:
Melt 2 tablespoons butter in a small sauce pan
Add onions and cook until translucent
Add thyme, cherries, balsamic vinegar, sugar and a pinch of salt, cover and cook on medium low for 15 minutes (until jammy).
Remove from heat and reserve
For the lamb:
Chop lamb into 1 inch chunks and generously season with salt and pepper.
In a medium skillet, melt 1 tablespoon of butter and saute garlic.
After about a minute, add lamb and sear on high until rare (about 3-5 minutes).
Reduce heat and add your choice of cheese, top with a lid to melt.
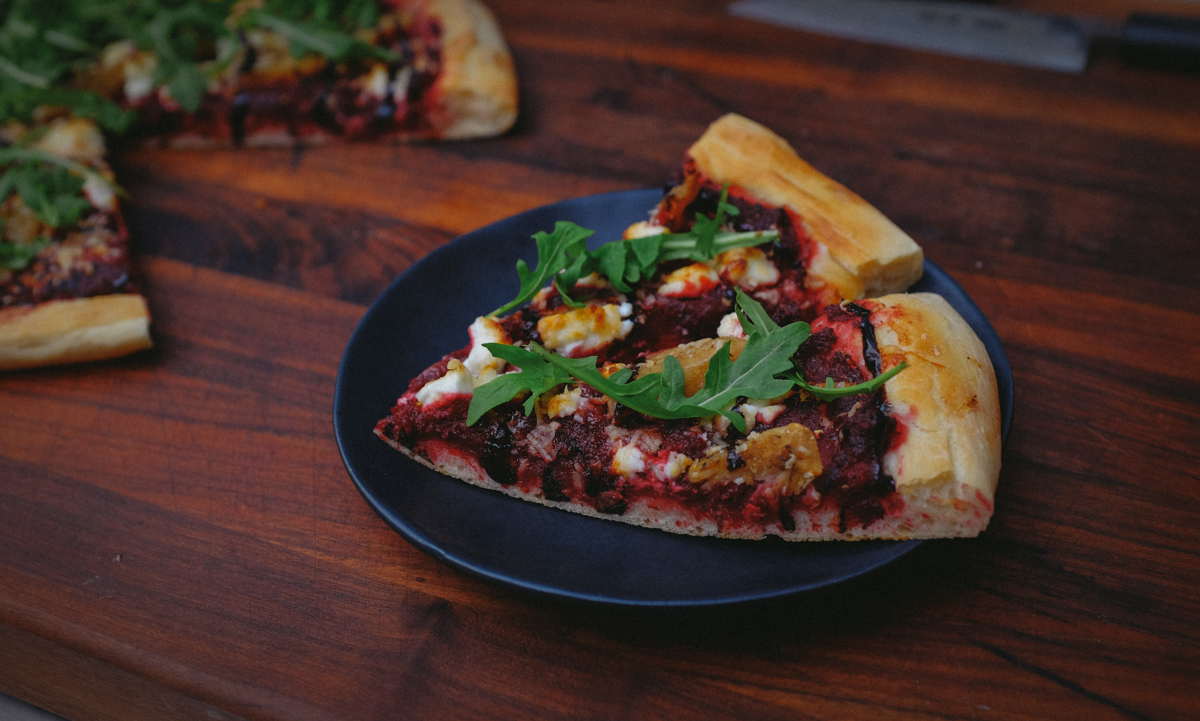
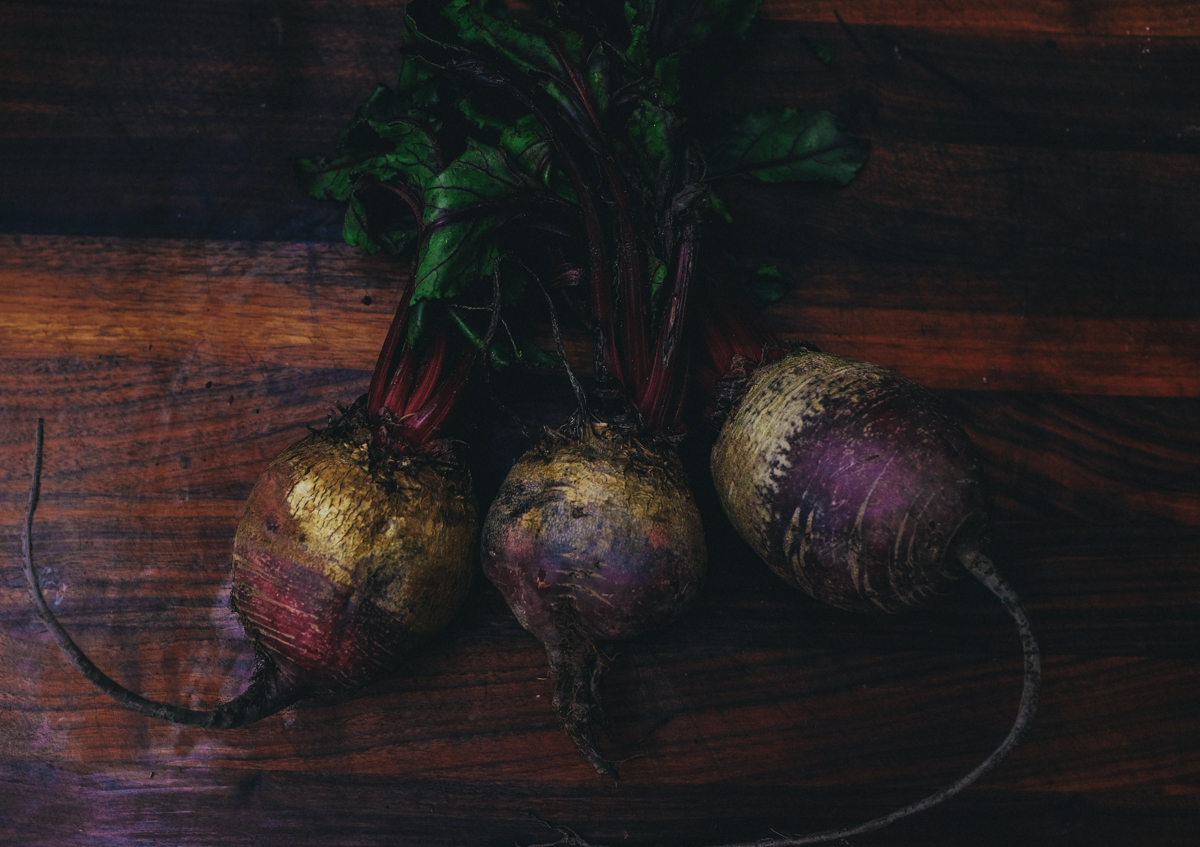
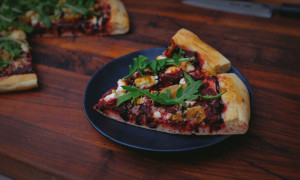
I have a difficult time trusting anyone that hates beets. Sweet and earthy with a color to rival any man made cuisines, beets tend to be a staple in our crisper drawer. I had stumbled across some images of a “beet pesto pizza” a little while back, and never one to turn down an opportunity to make pizza decided to explore the idea further.
This particular recipe took some liberties in using the word “pesto”, the list of ingredients leaving out any mention of basil and topping the pie with an ample amount of kale. A little wiser from my last run in with food-that-looks-too-good-to-taste-good we decided to overhaul their process from the beginning.
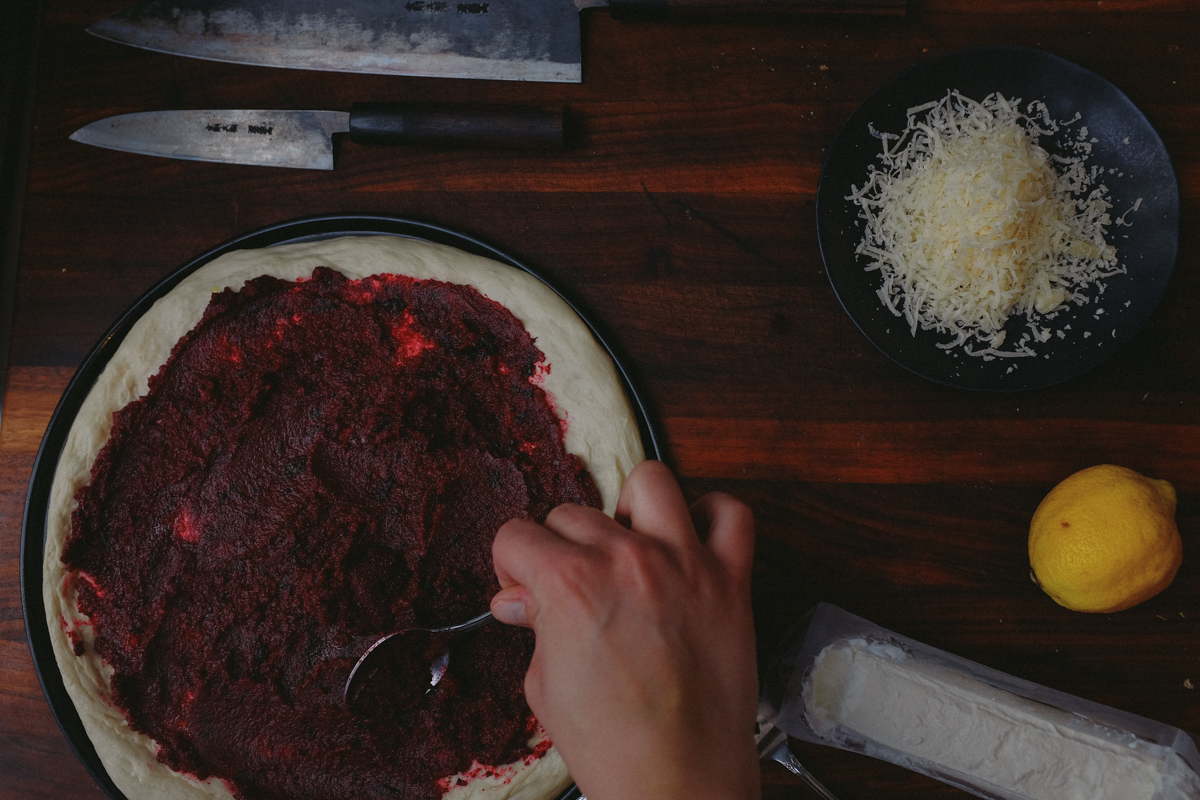
We roasted a large beet, half a red onion, and five cloves of garlic lightly tossed in olive oil for one hour. I tend to peel vegetables as little as I have to, and giving the beet a good scrub and cutting it into one inch cubes before roasting seemed to do the trick (it will also save you from staining your fingers too terribly). Once roasted, toss the beet, onions, and garlic into a food processor with a handful of fresh basil, two tablespoons of pine nuts, and a two tablespoons of olive oil. Pulse until the ingredients are well incorporated and form a paste and add salt and pepper to taste.
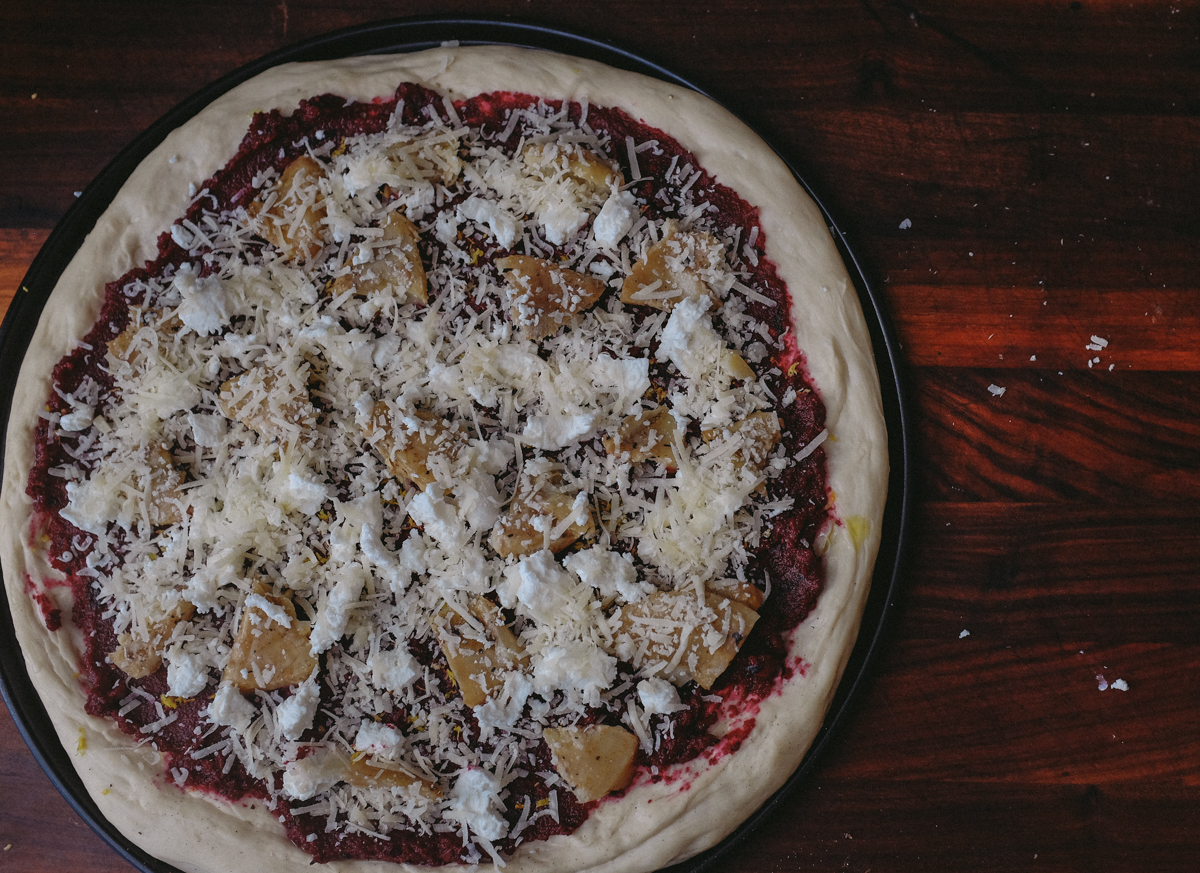
We opted to skip the layer of kale in the original recipe (the texture just didn’t seem right), and after spreading the beet mixture on the dough sprinkled liberally with lemon zest (about one whole lemons worth). I wouldn’t recommend skipping this step, the zest helped to add more depth to the overall flavor and cut the sweetness of the beet quite a bit. Next, add artichoke hearts, goat cheese, and parmesean and bake. Before serving I added a handful of baby arugula and a drizzle of balsamic glaze.
While this isn’t your traditional pesto pizza, the beets lend a new and distinct take on the classic pie. The deep flavor of roasted beets and garlic cut with the acidity of the lemon is a refreshing change from marinara while the basil brings you back to familiar territory. The crust seemed vitally important, so I would encourage taking the extra time to make yours from scratch.